
How To Add Custom Domain To Blogger From GoDaddy
which states that a custom domain name is a distinctive URL for a website, enhancing its brand value. For instance, Google's domain name is www.google.com. Below, I will detail the process of configuring a custom domain name such as www.example.com for your Blogger blog instead of using a subdomain like subdomain.blogspot.com.
.png "Adding a Custom Domain to Blogger Using GoDaddy") |
Blogger has recently undergone an interface update. Let's explore how to configure a domain name within the new Blogger interface.
How to Setup Custom Domain Name for Blogger using CNAME and A Records
Setup a Blogger Custom Domain Name
Once you've set up a custom domain name, your blog can be accessed using that domain, such as www.example.com. For instance, if you've purchased the domain www.example.com and configured it for your Blogger blog, then your blog will be accessible via www.example.com.
So, why wait? This setup will transform your Blogspot address from mywebsite.blogspot.com to mywebsite.com, making your blog available at mywebsite.com. Let's delve into how to accomplish this.
Set custom domain Name for Blogger Blog
To begin, purchase your desired domain name from a domain name registrar. Remember, the domain name is crucial for SEO and brand identity, so choose wisely. Once you've secured your domain name, follow these steps in the Blogger dashboard:
1. Click on the Settings button.
2. Scroll down to the Publishing Section.
3. Click on Custom Domain.

4. After purchasing your domain name, enter it into the designated field.
5. Click on the Save button to generate the CNAMEs.
6. The system will return an error message along with the updated CNAME values on your domain name provider. Two CNAME values will be generated: the first is common, and the second is unique.

You'll need to enter these CNAME values in the upcoming steps (number 11 in this guide).
7. To update these DNS settings, log in to your Domain Name Provider account, such as Namecheap or GoDaddy.
8. Find the DNS Settings options for your domain name.
9. Next, add HOST and POINT or Target Values.
10. First, add the A Records (these are common).
- There will be four A Records. Update each of these with Google’s IP.
- For the Host value of all A Records, use the symbol “@”.
- For the Point or Target value, add the IP addresses provided below one by one:
- 216.239.32.21
- 216.239.34.21
- 216.239.36.21
- 216.239.38.21
Now, update the CNAME records (there are two).
The common CNAME for all is:
- Name: www
- Destination: ghs.google.com
The unique CNAME generated for each blog. For example:
- Name: jsjry7b2kmmd
- Destination: gv-oygbohsqqryyjr.dv.googlehosted.com (refer to step 5 where it is generated).
The new settings for the domain name will take some time to update on the server, depending on the Time to Live (TTL) you've chosen (in our case, it is 1 hour, as shown in the screenshot above). Typically, Domain Name Providers display the TTL value in seconds. For instance, if the value is 7200, your DNS changes will go live after 2 hours.
Enable HTTPS for the custom domain
HTTPS ensures secure communication with your blog, which is essential for building trust with users and is also crucial for SEO purposes.
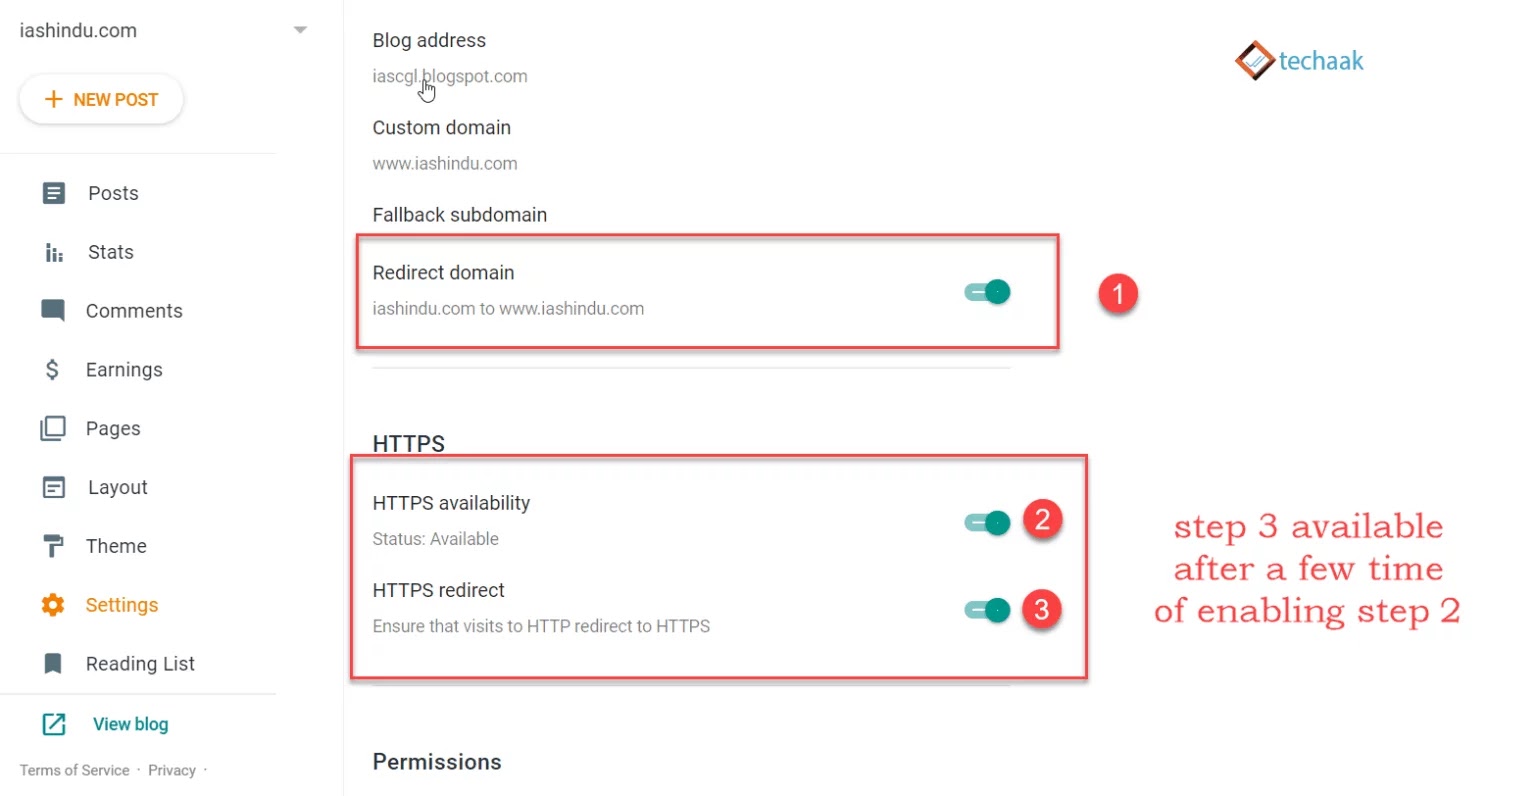
You need to direct your website to a single HTTPS URL. Under the fallback subdomain redirect domain settings:
1. Enable Redirect Domain from the naked domain to the www version of the domain.
2. Activate a secure server using HTTPS and ensure HTTPS availability. Please note that this process may take a few minutes, during which the website may not be reachable or may display an error message.
3. After a while, the website will be live again with HTTPS. Enable HTTPS redirect to prevent SEO conflicts.
Final Thought:
This article has provided a guide on setting up a custom domain name for your Blogger blog and enabling HTTPS for Blogger’s custom domain name.
If you have any doubts, questions, or feedback, please don't hesitate to ask in the comment section below.
FAQs About Custom Domain Blogger to Godaddy:
How do I use a custom domain on Blogger?
To start, navigate to the left menu and click on "Settings." Then, under the "Publishing" section, click on "Custom domain." Enter the URL of the domain you purchased, and finally, click on "Save."
How do I use my GoDaddy domain with Blogspot?
If you're using a different domain registrar, the basic steps will remain the same, but the interface may vary depending on your registrar.
1. Purchase your domain.
2. Add your domain to Blogger.
3. Update your DNS settings in GoDaddy or your chosen domain registrar.
4. Set up a redirect to "www".
5. Return to Blogger to complete the setup.
Is domain needed for Blogger?
Typically, blogs are hosted by Google as a subdomain of blogspot.com, such as www.myawesomeblog.blogspot.com. However, users also have the option to host them on a custom registered domain, like domain.tld.
.png&description=Adding a Custom Domain to Blogger Using GoDaddy)
0 Comments