
In this article, I will demonstrate how to add a contact form to your Blogger website. A contact form allows visitors to send messages directly from your website, eliminating the need for them to manually copy your email address and send messages. By incorporating a simple contact form, you can significantly enhance the user experience on your Blogger website.
You can integrate the contact form into pages such as "Contact Us," "Write for Us," or "Services" pages, enabling users to contact you directly without having to navigate to their email application or website.
.png "How to Create a \"Contact Us\" Page for Your Blogger/Blogspot Blog")
However, the default contact form widget has recently encountered issues and is no longer sending emails to the inbox. Therefore, we need to replace that form with a third-party form service.
Ensure compliance with Google Content Policy Guidelines by incorporating a contact us page on your blog. This page facilitates user communication with the webmaster and admin. Various methods exist to include a contact us page in Blogger. This guide will assist you in establishing a contact us page for your Blogger or Blogspot platform. Incorporating HTML for a contact us page is straightforward, and you can also obtain a free contact form for your blog's sidebar. Follow along to learn how to create a contact us page in Blogger.
Add Contact Us Page in Blogger
Certainly, you can easily create a contact us page in Blogger without requiring any technical expertise. Follow these simple steps:
1. Navigate to your Blogger dashboard and select the desired blog, then click on "Layout."
2. Add the contact form to your blog's sidebar.
Important Note: To ensure the functionality of the contact form on your contact us page in Blogger, it's essential to add the contact form and check the "show contact form" checkbox. Otherwise, the contact form will not operate.
3. Conceal the contact form from the blog sidebar using CSS code. Follow these steps to hide the contact form gadget from the blog sidebar:
a. Head to "Themes" and click on the three vertical dots, then select "Edit HTML."
b. Search for the following code:
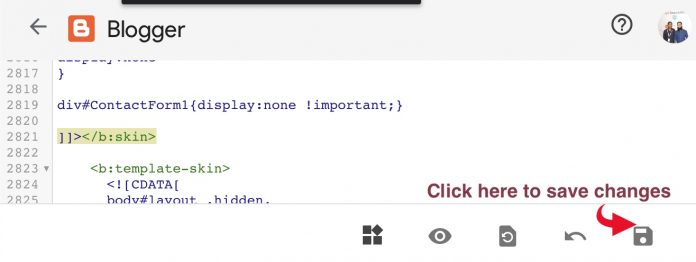
`]]></b:skin>`
Here's how to locate it within the Blogger HTML.

c. Insert the following CSS code just above it:
div#ContactForm1 {
display: none !important;
}
Refer to the screenshot below for guidance on implementation.

d. Finally, click on the floppy disk icon to save the changes.
After completing all the steps mentioned under point number three, your contact form will be present in the sidebar but will not be visible to the blog visitor.
2. Next, navigate to the Pages section.
3. Click the orange ⊕ icon to create a new page (not a post).

4. Paste the following HTML code (contact us page template) and publish the page. It's a stylish contact form designed for Blogger.
```html
<style>
.page-contact-form input, .page-contact-form textarea {
width: 100%;
max-width: 100%;
margin-bottom: 10px;
}
.page-contact-form input.contact-form-button.contact-form-button-submit {
padding: 10px;
background: #ea6337;
color: #fff;
border: none;
}
.page-contact-form input.contact-form-button.contact-form-button-submit:hover {
background: #d85b32;
color: #fff;
}
</style>
<div class="contact-form-widget page-contact-form">
<div class="form">
<form name="contact-form">
Name:<br />
<input class="contact-form-name" id="ContactForm1_contact-form-name" name="name" size="30" type="text" value="" /><br />
E-mail: <span id="required">*</span><br />
<input class="contact-form-email" id="ContactForm1_contact-form-email" name="email" size="30" type="text" value="" /><br />
Message: <span id="required">*</span><br />
<textarea class="contact-form-email-message" cols="25" id="ContactForm1_contact-form-email-message" name="email-message" rows="5"></textarea><br />
<input class="contact-form-button contact-form-button-submit" id="ContactForm1_contact-form-submit" type="button" value="Submit" /><br />
<div class="contact-form-error-message" id="ContactForm1_contact-form-error-message"></div>
<div class="contact-form-success-message" id="ContactForm1_contact-form-success-message"></div>
</form>
</div>
</div>
```
Check the following screenshot for reference.

5. Open the page in your web browser and check if the page is working correctly, and users can send you messages.
Navigate to the Pages section and click on the eye icon to view the contact us page.

Contact Us Page Example
Your contact us page for Blogger will resemble this example.

To ensure smooth operation and email delivery, send a test message through the new contact form. Upon submission, you'll be prompted to verify your email address.
Open your email inbox and follow the provided link to verify your email address.
Now, whenever a user enters their Name, Email Address, and Message, a new page with ReCaptcha will appear, minimizing spam entries in your contact form.
You can utilize the form on various pages such as Contact Us, Services, Guest Post, or even on the Homepage.
Other alternatives like Google Form and JotForm are available for use on your Blogger website.
I trust you have successfully integrated the new contact form into your Blogger website. If you have any inquiries, feel free to reach out to me on social media channels.
.png&description=How to Create a "Contact Us" Page for Your Blogger/Blogspot Blog)
0 Comments